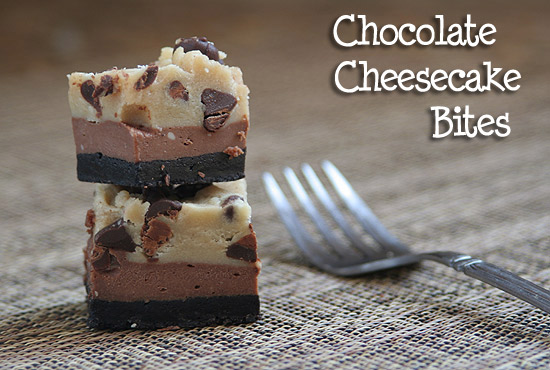
Chocolate Cheesecake Cookie Bites

We all know I have a sweet tooth. The endless dessert recipes that I post doesn’t hide that for one second. I pretty much don’t discriminate in the dessert world. I love ’em all. Loving the sweets like I do isn’t all the great on the waistline if I indulge too much. I’m pretty good about keeping it all in moderation because I know the alternative is me at 300 lbs.
Not only do I like to eat sweets but I LOVE to bake as well. The problem is that normally you can’t just bake a little bit of a recipe. You end up with a pan of brownies, stacks of cookies, an entire cake or pie or just more dessert than a few people can eat. Plus, set a whole pan of brownies out in front of someone who likes to eat is bad news.
Very bad news.
Take the fork and eat straight out of the pan type of bad news.
The other problem is with many bar, cake and pie desserts is that the size of the piece you grab can vary greatly. When you think you are just taking a “small piece” in reality it is a piece for 2 or 3 people. Opps. Not that it’s ever happened to me. *head down wincing in embarrassment*
So, what do I do to allow myself to bake, eat and still keep some kind of moderation? I “cut and freeze”. That’s right, if they are bars, brownies or even cheesecake, I cut it up and freeze ’em. (After taking a couple pieces initially, of course.) Cookies don’t need to be cut up…just throw them in an airtight container and into the freezer.
The greatest thing about the “cut and freeze” method is that the dessert lasts longer. I don’t find myself throwing away a half eating pan of brownies because they got stale before we could finish them off. Of course, some desserts do better with freezing than others but if you pop it in the microwave for a bit out of the freezer, it’s as good as new most of the time. I microwave a frozen chocolate chip cookie for about 20 seconds and it’s warm and yummy. Brownies and bars need a little more microwave time but they come out delicious too.
Today I wanted to share one of my favorite recipes that is perfect for the “cut and freeze” method. Not only do these give you an instant snack waiting in your freezer but they don’t even need to be heated up because they are delicious frozen. This isn’t a new recipe that I’m sharing either. It’s just a different way to look at it. They are bite-sized. Everything is adorable smaller, right?
These cheesecake bites are even great to take to a summer party so people can just grab a few. It’s very hard for someone to commit to an entire piece of cheesecake at a gathering, right? These bites make getting just a taste super easy. So, make a pan, cut ’em up and freeze them. You’ll thank me later!
To see how to make the bars and all the glorious photos go to: Chocolate Chip Chocolate Cheesecake Bars I’ll also post the printable recipe below for those who just want to get right to the baking. Once you have the cheesecake bars completely baked and chilled you will want to cut them into bite-sized pieces.
CUTTING THE BARS INTO BITES
Once your bars are chilled in the refrigerator (and you’ve taken a piece to eat) – cut the bars into large pieces (about 3″ x 3″ squares). Freeze those large pieces on a plate or in a Tupperware container until they are frozen. Remove from freezer and cut each piece into littler pieces with a large kitchen knife. I use that giant knife in the wood block knife sets and a cutting board. It makes it easier to get perfect cuts with a large knife.
I definitely found cutting the pieces into bites when they are frozen to be the easiest because otherwise the bars might squish and you won’t get those perfect bite slices. After all the pieces are cut into bite-sized pieces, put them in an air-tight container and store in your freezer. That way you’ll have something on hand when a snack attack comes on and you can just grab a bite or two and be satisfied.


If you like this recipe, why not PIN it?! Also, don’t forget to follow us on the Baby Gizmo Facebook Page for more recipes, reviews and travel!
Chocolate Cheesecake Cookie Bites
Ingredients
- 1/2 cups Oreo cookie crumbs
- 5 tablespoons unsalted butter melted
- Chocolate Chip Cookie Dough:
- 5 tablespoons unsalted butter room temperature
- 1/3 cup packed light brown sugar
- 3 tablespoons granulated sugar
- 1/4 teaspoon salt
- 1 teaspoon pure vanilla extract
- 3/4 cup flour
- 2/3 cup chocolate chips
- Cheesecake Filling:
- 10 oz cream cheese room temperature
- 1/4 cup sugar
- 1 large egg room temperature
- 1 teaspoon pure vanilla extract
- 1/2 cup melted chocolate I used Nestle semi-sweet chocolate chips melted
Instructions
- Preheat the oven to 325 F. Grease an 8 inch square baking pan OR line the pan with parchment paper or foil allowing a little overhang and spray with nonstick cooking spray for an easier clean up. Set aside.
- Mix the melted butter and Oreo crumbs until thoroughly combined. Press the mixture into the bottom of the prepared pan. Bake in preheated oven for 6 minutes. Remove pan to a cooling rack.
- While the crust is cooling, prepare the chocolate chip cookie dough. In a large bowl with an electric mixer (or use a stand mixer), beat butter, brown sugar, granulated sugar, salt and vanilla until smooth and thoroughly combined, about 1 minute. Mix in the flour on low speed, and mix until just incorporated. Mix in the chocolate chips. Set aside.
- In the bowl of a stand mixer or in a large bowl cream together the cream cheese and sugar until smooth. Mix in the egg and vanilla on low speed just until combined. Add the 1/2 cup melted chocolate (that has been cooled slightly) and mix just until combined again. Pour the cheesecake batter into the prepared crust.
- Flatten the clumps of dough in your palms to flatten them out a bit. Distribute the cookie dough onto the top of the cheesecake batter. Be sure to use all of the dough. You will cover most of the cheesecake batter.
- Bake for about 30-32 minutes, until the top feels dry and firm (the cookie dough) and the entire pan looks set. Move bars to a cooling rack and allow to cool completely. After 30 minutes, I popped mine in the refrigerator.
- Slice into desired size and store in the refrigerator. I serve these bars cold.

This looks incredible!!! You have me craving for some right now, wish I could reach over through my laptop screen 🙂
I saw something similar the other day and am so glad Ive seen it again so I can save this scrummy looking thing! Very much hoping to make these sometime soon..