Bake your cake according to the box. It's easiest to just make it in a 13x9 inch pan. Remove from oven and cool completely.
Once cake is COMPLETELY cooled, crumble it up. No need for a food processor or anything like that - just mash it up with your hands.
Add 3/4 container of frosting of your choice. Don't use too much frosting or the cake pops will be too wet. Not good. By the way, cream cheese frosting and dark chocolate cake make wonderful cake pops!
Combine the frosting and the cake crumbs with your hands. Yes, your hands! It just works best to clean your hands really well and get in there. Here is how it will look when it is all combined.
Next you want to make the actual cake balls. I found it easiest to use a small cookie scoop so that I could guarantee that all the cake pops were the same size.
After you scoop the cake, roll them in your hand until they are complete round balls.
Carefully melt 1 square (or about 1/4 cup) of the candy melt in the microwave according to the package. Again, you can use whatever flavor you'd like - I went with vanilla. At this point, you just need a little candy melted to make sure the sticks stay. You don't have to color the candy melt yet.
Take one cake pop stick and dip the very end in the candy melt and then stick into the cake ball. Repeat with all the cake balls. Put the cake pops into the freezer to set for 30 minutes.
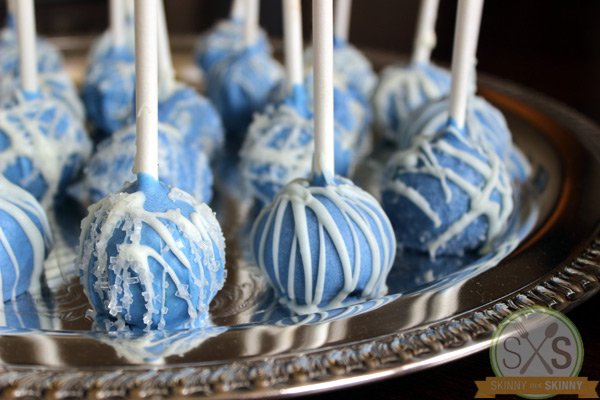
While the cake pops are chilling, melt and color the rest of the candy melts. Melt the candy in the microwave according the package and add food coloring. I was going for cobalt blue. HINT: If you plan to make a design on the outside of the cake pops, make sure you don't color all your candy melts. Leave a little to decorate.
Remove the cake pops from the freezer. Dip into the candy melt until complete covered.
You can either set the cake pops on a wax paper lined tray to harden or devise some type of container to keep them upright to keep the completely round shape. I wanted to just display them on a beautiful silver tray, so I didn't mind if the bottoms were flat. That helped them stand up. :)
Let the cake pops set out until hardened. Do not put them in the refrigerator! You just let them harden at room temperature.
To add a fancy flair, I took white candy melt and drizzled designs on the cake pops and sprinkled some with the big, white, crystal sugar sprinkles.